
Creating Variable Products
Many times we have products that require the customer to provide specific details as to how they want that product. For example, a customer needs to specify the size, color and type of shirt that they want. Additionally, you may want to charge more for specific product characteristics. For example, charging more for specific shirt colors like blue, or for specific sizes, like large. To do this we can assign a kind of “base” price, to the product you’re creating and then charge, or not, for the variations specified by the customer. Let’s see how this is done.
First create a product in your product dashboard by going to Product>Add New
(You can also select an old product and follow the same procedure!)
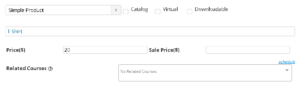
The first thing is that you MUST select a “Simple Product” type and give the product a price. This price will serve as our “base” price. For instance, T-Shirts at the LEAST will cost our customer $20. Therefore I should set the product price to $20.
Now we will allow for the user to provide specific details for the product and charge the user additional money based on what specific details they provide.
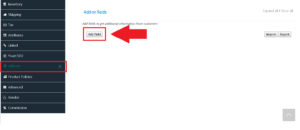
Scroll to the bottom of the page, you will see “Add-Ons”, click this and then click the button “Add Field”
Each field represents a different characteristic for your product, for example, color. We can apply many different parameters to each field in order to allow our customer to fully specify their custom details.
Let’s go through all of the ways we can make a characteristic by getting familiar with all the options we have. After clicking “Add Field” you will see this:

Field Type
Our “Field Type”, or “Type” allows us to select between 8 different options, here are their descriptions:
- Multiple Choice – When your customer clicks on this, they will see a drop down menu with all the different options. Alternatively, you can choose to use “radio buttons” or tiny images to display each option.
- Checkboxes – When your customer clicks on this, they will see checkboxes and be able to select multiple options
- Short Text – Customer will be able to write a short text to specify their detail
- Long Text – Customer will be able to write a long text to specify their detail
- File Upload – Customer will be able to upload a file to specify their product detail
- Name Your Price – Customer will be able to choose what they want to pay
- Quantity – Customer will be able to select their quantity here
- Heading – Simply creates a “Heading” for your product to provide further information
Each Field Type has their own little characteristics which, hopefully, are self explanatory (Example: There are three types of “Multiple Choice” which are, “Dropdown menu”, “Radio Button” or “tiny image”.) However, if you are having trouble with these, please contact Tyfoods via Instagram.com/tyfoods, Facebook.com/propdanceculture, or Email (Tyfoods@propdanceculture.com).
Title
The “Title” specifies the name of the variation. In this case our variation is called “Colors”. We can format the title as either big or small. Select “Format Title” as “Heading” for big and “Label” for small.
Required Field
We can choose to make this variation required or not. For example, when selling T-Shirts customers MUST pick their size and color, otherwise we will not know what to ship! Check this box in case your product characteristics MUST be specified by the user.
Add Description
Sometimes customers can find certain variations confusing, for example if you put “size” the customer may need additional information to know what “size” you are referring to. In the case of T-Shirts, we can describe our “Size” variation, by saying “Over all size of the T-Shirt”. If you need to explain a variation, or add additional information, then this is the place to do it.
Options
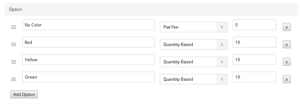
Here we specify the options we have when it comes to our variation called “Colors”. For this example, we write No Color, Red, Yellow and Green. As you can see in the picture below, we have written in these options in the first column. In the second column we state whether the option, if selected should apply a “Flat Rate”, “Quantity Rate”, or “Percentage Rate”.
- Flat Rate – specifies that when a customer picks this option we should add a specific amount of money to the total price regardless of the amount of items that person buys.
- Usage Example: Someone buys a T-Shirt, and when they pick this option they receive ONE and only one bonus hat no matter how many T-Shirts they buy.
- Quantity Rate – specifies that when a customer picks this option we should add a specific amount of money to the total price BASED on the amount of items a person buys.
- Usage Example: Someone buys a T-Shirt made with golden buttons which raises the price $10. Each additional T-shirt the person buys will also be $10 more expensive with golden buttons. Thus the customer pays an additional amount PER item they buy.
- Percentage Rate – specifies that when a customer picks this option we should add a percentage of the total amount of money that the item costs.
- Usage Example: Someone buys a T-Shirt with long sleeves and this adds 50% of the total product cost to the product. In other words, a $20 shirt becomes a $30 dollar shirt.
In our example below, we use Flat Rate to add $0 to a customers who picks “No Color”, however, we use “Quantity Rate” for customers who pick Red, Yellow or Green T-Shirts.
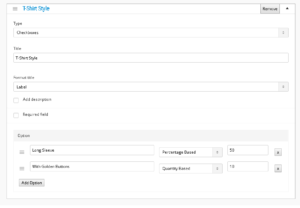
Furthermore, we create another Field called “T-Shirt Style” which allows the customer to select buttons and/or long sleeves. We used checkboxes in order to allow the customer to check one, none or all boxes.
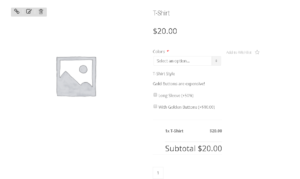
In our finished example we can see all the details we made in our shop dashboard appear on the front end of our store. Our T-Shirt color is a required field and so there is a red asterisk “*” next to it. Additionally, we can see the check boxes that we’ve made.
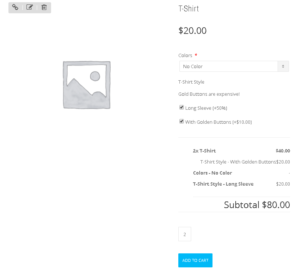
Here we selected some of the variations that we created and as we can see, we get the result that we wanted!
Congratulations, you’ve created your first FULLY customizable product! If there are any questions please direct them to Tyfoods via Instagram.com/tyfoods, Facebook.com/propdanceculture, or Email (Tyfoods@propdanceculture.com).
